Mayo is one of those all-American condiments, that when it’s store bought comes with all-American GMO’s and other gut irritating ingredients. But if you have the right tools, which is really a wide mouthed mason jar and an immersion blender, you can have your own Mayo in minutes, and it’s way tastier!
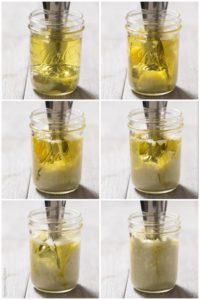
All you do is put all the ingredients in the mason jar, then insert the hand immersion blender and continue moving the blender around until all the ingredients are whipped and emulsified.
Leave the immersion blender on at the bottom of the jar for a good 20-30 seconds before moving it. You’ll see the egg and oil emulsifying and turning white. Then slowly and slightly lift the blender to continue emulsifying all the way through. Within a minute or 2 you have a jar of fresh,healthy, ReNewed Life approved and paleo – friendly mayonnaise!
If the mayo turns out thicker than you’d like, add more oil.
If the mayo turns out thinner than you’d like transform it into a dressing. Add some Italian Herb seasoning and you have a nice Ranch-like dressing to enjoy.
While this isn’t your traditional granola, I do enjoy this version of it, and even my most picky lil’ one likes it, so that says A LOT! I add collagen to give it a nice protein boost and the green banana flour for some resistant starch. And the added bonus the recipe is Autoimmune Protocol friendly.
Using a big mixing bowl dump all the ingredients together, adding the cup of hot water last.
Preheat the oven to 300.
Mix and mash it until the banana is spread throughout the mixture and the collagen is clump free.
Line with a large baking sheet with parchment paper. Spread the mixture on the parchment paper until it’s flat and covers the pan.
Bake for 30-40 minutes until it’s browned.
And that’s it.
I like to store it in the refrigerator and just put it in the oven in the mornings I’d like to enjoy it by reheating it at 250 for 15 minutes.
Growing up my mom made Spaghetti Pie, it was a great comfort food that the family always enjoyed and looked forward to. I love recipes that have a story, a history, a memory, so I made my own spin on my mom’s (actually my aunt’s recipe) to accommodate our way of eating. And now it is a wonderful comfort that my family and I enjoy.
Even better, it’s easy and low fuss. Though it may not look gourmet or pretty, it’s delicious and everyone enjoys it without complaints. Win – Win!
Adapting a family recipe, or just a recipe that you’re comfortable and accustomed to making is a great way to begin when you’re overhauling your diet. It can feel overwhelming enough just to break old habits. To learn a whole new vernacular of recipes can just send you over-the-top. When my clients are just starting out, I recommend beginning with what you know and are comfortable with and adapting from there. You want this to be a sustainable lifestyle, and if you throw too much, too soon you’re likely to overwhelm yourself and throw in the towel. So do yourself a favor, if this real, whole food diet is new to you. Start with what you know and make some healthy swaps. Like in this recipe, we swap out traditional spaghetti pasta with spaghetti squash (or zucchini noodles).
I hope you enjoy the recipe. It tastes much better than it looks, I promise!
‘Spaghetti’ Pie
1 large spaghetti squash(or 4 medium / large zucchini squash)
For Fall / Winter time spaghetti squash is a great option. It’s best to bake the spaghetti squash ahead of time. On my prep day I’ll throw all my starchy veggies in the oven, so they’re ready to go when I’m ready to prepare them for meals throughout the week. I cut the spaghetti squash the short way to make several small circles, take the seeds out, and bake at 350 (convection) for 45 minutes (may take longer in non-convection ovens). Once cooled, it’s easy to remove the seeds and remove the strings of the squash. Using my Misto sprayer, I coat my 4 quart Pyrex casserole dish with olive oil (and I’m generous because I like easy clean-up).
Recent Comments